Pattern Review // Megan Nielsen Pattern’s Axel Skirt (Version 2)
May 17, 2016 | by huenma5_wp


Hello again! Me-made-may is back again and I’m taking part for the 2nd year running with my pledge to wear or use at least 1 handmade item a day. Last year I did weekly round-ups but as I was sick in bed for a good part of the last week, I figured I would do one big summary at the end of the entire month. Feel free to play along with me on instagram at @jessiehuen if you like! How about you guys, anyone taking part? Drop me a message below if you are and I’ll be sure to check you out (“how YOU doin’?”) on instagram or flickr!
As per usual, me-made-may is making me incredibly conscious of holes in my me-made wardrobe – most conspicuous of which is my lack of appropriate office wear. I know I lament this EVERY. SINGLE. YEAR. but it’s a sad fact of life that vast majority of patterns I have are very casual in style and anything of a more formal nature takes ages to whip up (my go to Itch to Stitch Lindy Petal Skirt excluded of course).
ENTER THIS SPANKIN’ NEW PATTERN FROM MEGAN NIELSEN: THE AXEL SKIRT.


I had the wonderful opportunity to help pattern test Megan’s latest pattern, the Axel Skirt, earlier this year and loved the results! If Megan’s posts are anything to go by, she’s made a ton of these skirts – and now, so have I! At the current count, I’ve made up 4 of these skirts – 1 version 2 and 3 version 3s, although rightfully, 2 of these turned out to be unwearable/unintentional toiles that had to be sent to the recycling stash. I would love to talk about all 4 of them in a single post but I’ve just typed it out and realised that (as usual) I have too much to say – so look out for part 2 of this post featuring version 3 tomorrow!
My first test of the pattern was version 2 – the knee length option with the hip sashes. I thought it was really cute and on trend (check out this anthropologie beauty here) plus the shape was very similar to an existing knit skirt I have so I knew it would work for me. And… I was right! The fit for this view of the skirt was spot on for me, even with the addition of lining, and the length was appropriate for work and church – the 2 measures by which I decide if a garment is considered ‘decent’ and fit for polite company.

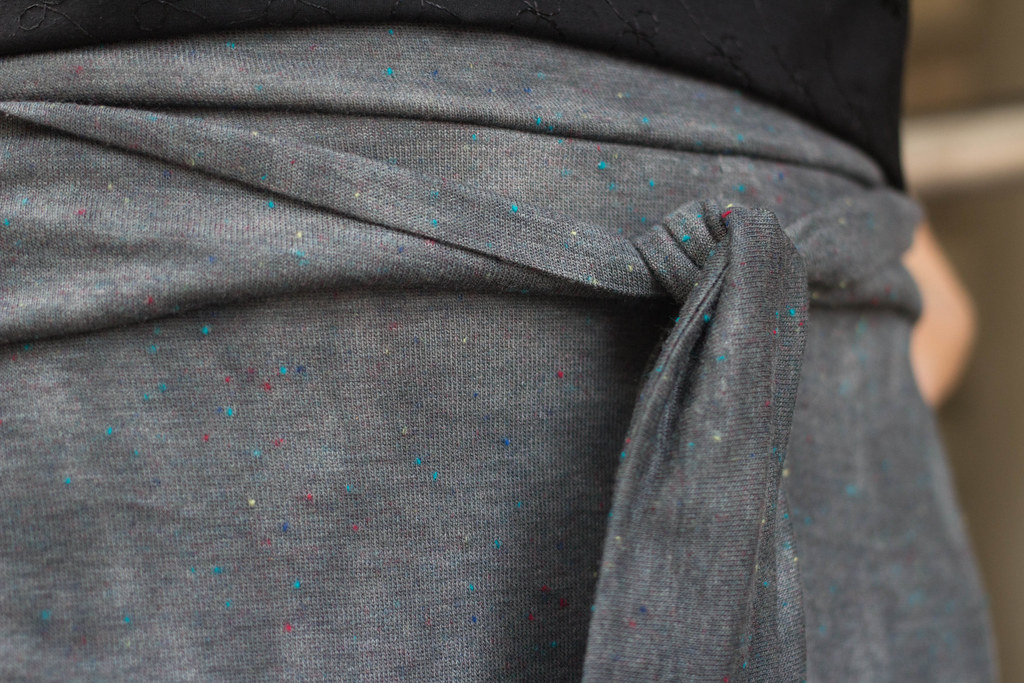
Fabric – I spent quite a while trying to figure out the best fabric to use for this pattern as I wanted something versatile (for maximum mix-and-matching) but not boring, and suited to the pattern design. I ended up picking this extremely lightweight mid-grey cotton jersey with a faded effect and colourful flecks sewn into the weave. The only problem was that it was wayyyy too sheer! Eventually I decided to line the entire skirt (except the sashes) using a cream poly jersey crepe to give the main fabric a bit more heft.
Alterations – None, apart from lining the skirt. I cut a size S and cut 2 of every pattern piece – 1 of the main fabric and 1 of the lining, apart from the hip sashes. I didn’t baste the main pieces and linings together as I was wary of causing any pulling in the main fabric, but I treated both lining as main fabric as a single piece and constructed the skirt as set out in the instructions. I even lined the waistband as I was sure that the main fabric without any elastic wouldn’t be sufficient to hold up the weight of the skirt. If I had to remake this skirt using the same fabric, I would probably have inserted wide elastic into the waistband to provide more support.
Fit – As I mentioned the fit was spot on, although it gets just a tad too tight after too much snacking. My only peeve was that the sashes if attached at the hip (as indicated in the pattern) and tied in front, eventually end up too low as the fabric stretches as the day goes on. I would probably try to attach them to the waistband or across the waistband and hip the next time. One other change I would make would be to narrow the waistband as my short and thick waist means that wide waistbands can end up looking stumpy on me.
What I loved: That it’s reversible, what a quick and easy make this was and how easy it is to wear. My preference is to wear it with tops tucked in – in fact I paired it with this self drafted peter pan collared top (below) to give you an idea of how it might look with Megan’s recently released Sudley top! Elegant, non? MOST IMPORTANTLY, how effective the hip sashes are at hiding my 12 week old food baby!
Now, if you’re still up for it, head on over to Part 2 to read more about my thoughts on version 3 of the Axel pattern!
Disclaimer: I received a copy of Megan Nielsen’s Axel Pattern for free in exchange for helping to pattern test this pattern prior to its release. Be that as it may, my opinions, views and terrible posing above are completely my own.
RELATED POSTS
View all