


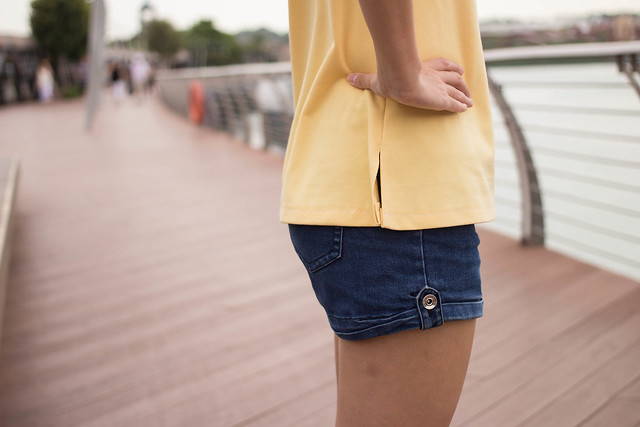
When I was about 8, I had a friend who had a “Copabanana” phase. This means she sang that one line from Barry Manilow’s Copacabana – “At the Copa, Copacabana” over and over again, but as “Copabanana” instead of “Copacabana”. Clearly it was annoying enough to scar me for life, because I still accidentally sing the wrong lyrics today. So when I sewed up a yellow Coco Top last December, the natural choice of name was “Cocobanana”. #sorrynotsorry
I’ve briefly mentioned in an earlier post how fast and easy the Coco pattern is to sew up, but I never in a million years dreamed that I would be able to sew it from cutting to pressing in 4 hours and still find that I had done a decent job on finishing the hems. As some of you would have seen on my instagram, I rushed out this baby in a single afternoon between sitting for an exam paper and hightailing it to the airport to catch a flight to Hong Kong.
http://instagram.com/p/whBEPbgR9L/?modal=true
But let’s start from the very beginning shall we? I first saw the Coco when I became interested in sewing early last year and discovered the existence of sewing patterns (you’d be surprised how many people think all homemade garments are drafted by the sewists themselves!). Being very much a pear-shaped lady I didn’t think the A-line shape of the top would work for me as I felt it would accentuate my already ginormous hips, much in the way peplum tops do. Even after sewing it up in my size and trying it on (with the jeggings above), I wasn’t convinced it wasn’t a good match for my body shape. It was only after getting a second (and third!) opinion that I decided to leave it as it was and test it out on my Hong Kong trip.
And how I loved it on that trip. I loved how fitted the top is – the armholes are a good fit and the sleeves are slim and makes my very un-toned arms look thinner than they actually are. Even the bust area needed no SBA! The only thing that I might change is to take a wedge out of the neckline as it tends to gape a bit (would that be a narrow shoulder adjustment? I’m not sure of the terminology).


In terms of outfit combinations, I knew it was a keeper when I tucked it into a pleated skirt I had and it looked like a great basic fitted/ structured tee that wasn’t too boxy for my liking. While I do still have misgivings about pairing my Cocobanana with jeans, after reviewing the photos above I feel it just about passes the shorts-matching test. I’m pretty sure this pattern is going be one of those that keeps on giving – and I haven’t even made up the dress version yet!
On to construction – like I mentioned above, the top came together in no time at all. The instructions were clear, helped along with Tilly’s sew-along on her blog, and I loved that the sleeves were sewed in flat, it’s SO much easier for beginners. Since the recommended fabrics are low-stretch knit fabrics, like ponte knit, that means it sews up more or less like woven fabric – none of the pesky problems that come with lighter weight jerseys, hurray!


As for alterations, I sewed a size 2, grading out to size 3 at the waist and hips. It was the first time I tried any sort of alteration on paper before sewing up my muslin and I found this pattern really easy to grade and to blend between sizes. In addition, I referred to Tilly’s tutorial to create this summery short sleeved version of the top.
Like I said before, I would most definitely recommend this pattern to anyone, even a complete beginner! I really don’t think it matters that this pattern is for knit fabrics, the instructions are so clear that it shouldn’t be a problem at all.

It looks gorgeous! I love the yellow, but I am a redhead, so unfortunately it’s a not a colour I can wear! I’m definitely going to try your way of shaping though as it is much more flattering for us pears. 🙂
I didn’t think I could wear yellow either until I tried this top (yellow skin undertones etc etc) so I was pretty surprised how well I liked it! I’m still trying to figure out what works on my pear shape, I’d love to hear about what worked for you and what didn’t – pears of the world unite!
I love the color! I am more of a square shape rather than a pear, so I don’t have any suggestions, but I think the fit of your Coco is lovely.
Thank you! I was so fortunate that it fit almost perfectly right out of the envelope – I’m not very experienced with fitting yet but hopefully I can fix that gapey neckline!
I’m never going to listen to Copacabana in the same way again! Your top looks lovely though, well done!
Thanks so much! (And yes, Copabanana does tend to get stuck in one’s head doesn’t it? 😉 )